
- INTRODUCTION -
Introduction
To access the Ecospend Gateway Sandbox environment you must first apply via the enrollment form.
The Ecospend Gateway provides REST APIs, whitelabel supporting UI solutions and value added services to enrich banking data.
This documentation aims to guide development teams while integrating with the Ecospend Gateway. While this introduction section explains the API-wide applied standards, authentication and overall rules of our engine, seperate sub sections will explain domain specific user journeys and the technical specifications of the Ecospend Gateway endpoints.
[Remark]Ecospend Gateway endpoints POST operations typically responds under a second.
Yet the services we provide depend on the bank's open banking APIs and several other external services, where the ultimate response times are dependent to such services. Therefore we recommend you to handle extreme cases where an operation may take up to 100 seconds to respond.
Get Access
The Ecospend Gateway is a pure open banking based SaaS solution that will easily enable you to enhance your platform with open banking functionality.
APPLY NOWGlossary
| Term | Description |
|---|---|
| TPP |
Third Party Provider. Refers to Ecospend. |
| ASPSP |
Account Servicing Payment Service Provider. Refers to the banks. |
| PSU |
Payment Service User. A natural or legal person making use of a payment service as a payee, payer or both. Refers to the end user. |
| PIS |
Payment Initiation Services An online service to initiate a payment order at the request of the payment service user with respect to a payment account held at another payment service provider. |
| AIS |
Account Information Services Account information services as an online service to provide consolidated information on one or more payment accounts. |
| Tenant |
An organization making use of our API. Refers to you. |
| Client |
Software belonging to a tenant which consumes our endpoints. Refers to your system. |
Onboarding
To start using our APIs you need to onboard with us to get a Client Id (client_id) and Client Secret (client_secret). For onboarding we will need the following information:
- The full name of your company/organization
- An email address for your admin user (used as the username)
- A mobile phone number for the admin user (used for two-factor authentication)
Once onboarded, a Client Id is generated for you and you will have access to the Ecospend Gateway Management Console, through which you can generate your Client Secret(s).
You will be given a separate pair of Client Id and Client Secret for our Sandbox and Production environments. Ecospend does not store these parameters, so you need to keep them safe and secure.
Open Banking Consent Flow
Every operation in Open Banking begins by getting the user's consent for the operation at hand (whether it is accessing the PSU's bank account information or initiating a payment). Only after the PSU has successfully authorized the requested consent on their digital banking platform can the operation be carried out.
The consent journey requires multiple steps, including redirects to and from the PSU’s ASPSP. These can be visualized in the diagram below.
Click on the diagram to see it full size.

API Fundamentals
- The Ecospend Gateway API is implemented according to OAS 3.0.
- The Ecospend Gateway API provides POST endpoints to create records and GET endpoints to return records.
- GET endpoints support query parameters to filter the result set.
- The result set responses will be paged, so it is necessary to loop through the pages with consecutive GET calls to fetch all of the result set.
- POST endpoints have two optional fields, merchant_id and merchant_user_id. These two fields can be given any value and can be used as query parameters when fetching records. A standard usage is to assign the User_Id from your system to merchant_user_id. If you are providing our service to your own business clients (i.e. merchants) the merchant_id can be filled with your own system’s Merchant Id.
- While creating a consent, the redirect_url field is mandatory. This is used to return the PSU back to your system after the PSU's journey on the bank side is completed.
- To secure the PSU's journey, all redirect_urls need to be pre-registered via the Management Console prior to use.
- The bank_consent_url will be used by you to redirect the PSU to their bank. This is where the PSU will authenticate and authorize the requested operation.
Webhook Notifications
The Ecospend Gateway provides webhook notifications in several instances to notify you of changes in data. These are listed below.
PIS Webhook Notifications
| Webhook Trigger | record_type | record_id | event_value(s) |
|---|---|---|---|
| Status Change: Open banking payment orders' status has changed. | Payment | payment_id |
|
| Payout | payout_id | ||
| StandingOrder | standing_order_id | ||
| Reconciliation: Open banking payment is settled in the creditor account. | Payment | payment_id |
|
| Balance Drop: Payout account balance has dropped below threshold. | PayoutBalance | n/a |
|
[Remark] Specific to this webhook call, the request body lacks the 'record_id' field and has the 'amount' field which provides the up-to-date balance of the payout account. |
|||
| Paylink Visited: A PSU has visited a 'Paylink' and made a bank selection. | PaylinkPayment | payment_id |
|
| Frplink Visited: The PSU visits a 'Frplink' and made a bank selection | Frplink | standing_order_id |
|
| Status Change: Any Paylink or Frplink initiated open banking payment orders' status has changed. | PaylinkPayment | payment_id |
|
| Frplink | standing_order_id | ||
AIS Webhook Notifications
| Consent Status Change: Any PSU Consent is either expired or revoked. | Consent | consent_id |
|
| Consent Status Change: The consent expiration and reconfirmation warnings. | Consent | consent_id |
|
| Account: The bank account is created. | Account | account_id |
|
| Data Updated: The bank account information is refreshed from the bank. |
|
account_id |
|
| [*] Categorization Complete: Transactions of all accounts under a specific consent_id have been processed and categorized. |
|
consent_id |
|
| Account Assessment Complete: Account Assessment calculations has been completed. |
|
account_id |
|
|
[NEW] Consent Journey Completed |
Consent | consent_id |
|
[*] Either one of the Caterogization Complete event's will trigger. The default action is ConsentTransaction. If you want to be informed for each account's transactions processed please make sure us to configure this for you.
[Remark] For Paylink webhooks the event_id will be the PaylinkResponse.unique_id.
You must provide a publicly accessible REST (POST) endpoint with the signature below to make use of the Gateway Webhook Notifications. The security of the data transmitted is sustained via the 'X-Signature' header parameter. X-Signature is the request body hashed with the 'secret'.
Both your webhook URL and the 'secret' can be managed by you on the Ecospend Management Console under the API Configurations menu.
[Remark] We strongly recommend that you implement the Signature Verification.
[Remark] Unless your webhook endpoint responds with an HTTP200 message, the exact same webhook request will be sent again after 60 minutes. There will be a maximum of 24 retries.
Webhook Request
|
=HEADER=
X-Signature: " 5fe7f5f21cc138aa96dfab3fe6fb4e5d1a91fc07 "
=BODY=
{ |
| Parameter | Description |
|---|---|
| X-Signature |
Request body hashed with the 'secret'. SEE: Signature Verification |
| event_timestamp |
UTC datetime of the event. This value will NOT change if the webhook call is retried, it will still be the value representing the original operation's datetime. |
| event_id |
GUID value assigned to the webhook event. This value will NOT change if the webhook call is retried. [Remark] For Paylink webhooks, the event_id will be the PaylinkResponse.unique_id. |
| record_type |
Enumeration representing which data has been changed. SEE: Record Types call the corresponding GET endpoint to retrieve the up-to-date data. |
| record_id |
Identification information that is required as the path parameter to GET the changed data. SEE: Event Types [Remark] This field is sent within every webhook request except the PayoutBalance webhook notification. |
| amount |
The up-to-date amount of the payout account that has fallen below the defined threshold. The account needs to be funded after receiving this notification in order to carry on with the payout operations without any interruption. [Remark] This field is sent only within the PayoutBalance webhook notification. |
| additional_params |
If the related record was POSTed (created) with 'additional_params' field, the value assigned will be returned within the webhook notification |
| consent_id |
The identification of the AIS consent object assigned by the Ecospend Gateway. [Remark] This field is sent for every AIS webhook notification. |
Reponse
200 success
== No Response Body Required ==
Signature Verification
Ecospend Gateway will POST a request with the X-Signature header parameter and body. To make sure that your endpoint is called from the Ecospend Gateway you will need to compare the received request body to the signature. The code samples below show how to implement this:
public bool VerifySignature(string responseBody, string signature)
{
     //This is the Webhook Secret you have generated from the Management Console.
     string secret = "el_VldTsHFOsbRTkoJt";
     ASCIIEncoding encoding = new ASCIIEncoding();
     byte[] responseBodyBytes = encoding.GetBytes(responseBody);
     byte[] secretBytes = encoding.GetBytes(secret);
     byte[] responseBodyHashed;
     using (HMACSHA256 hash = new HMACSHA256(secretBytes))
     {
         responseBodyHashed = hash.ComputeHash(responseBodyBytes);
     }
     string responseBody2Signature = BitConverter.ToString(responseBodyHashed).Replace("-", "").ToLower();
     bool result = signature.Equals(responseBody2Signature);
     return result;
}
import java.nio.charset.StandardCharsets;
import java.security.MessageDigest;
import java.security.NoSuchAlgorithmException;
import java.security.InvalidKeyException;
import javax.xml.bind.DatatypeConverter;
import java.security.Key;
import javax.crypto.Mac;
import javax.crypto.spec.SecretKeySpec;
public static boolean VerifySignature(String responseBody, String signature) throws NoSuchAlgorithmException, InvalidKeyException {
   //This is the Webhook Secret you have generated from Management Console.
   String secret = "el_VldTsHFOsbRTkoJt";
   byte[] responseBodyBytes = responseBody.getBytes(StandardCharsets.US_ASCII);
   byte[] secretBytes = secret.getBytes(StandardCharsets.US_ASCII);
   Key sk = new SecretKeySpec(secretBytes, "HmacSHA256");
   Mac mac = Mac.getInstance(sk.getAlgorithm());
   mac.init(sk);
   final byte[] hmac = mac.doFinal(responseBodyBytes);
   String responseBody2Signature = DatatypeConverter.printHexBinary(hmac).toLowerCase();
   boolean result = signature.equals(responseBody2Signature);
   return result;
}
var CryptoJS = require("crypto-js");
let VerifySignature = (responseBody, signature) => {
    //This is the Webhook Secret you have generated from Management Console.
    let secret = "el_VldTsHFOsbRTkoJt"
    let calculatedSignature = CryptoJS.HmacSHA256(responseBody, secret).toString(CryptoJS.enc.Hex)
    let isVerified = calculatedSignature == signature
    return isVerified
}
from Cryptodome.Hash import HMAC, SHA256
def verify_signature(response_body, signature):
    # This is the Webhook Secret you have generated from Management Console.
    secret = b"el_VldTsHFOsbRTkoJt"
    response_body_as_bytes = str.encode(response_body)
    h = HMAC.new(secret, digestmod=SHA256)
    h.update(response_body_as_bytes)
    calculated_signature = h.hexdigest()
    is_verified = signature == calculated_signature
    return is_verified
import (
    "crypto/hmac"
    "crypto/sha256"
    "encoding/hex"
    "strings"
)
func VerifySignature(responseBody string, signature string) bool {
   //This is the Webhook Secret you have generated from Management Console.
   secret := "el_VldTsHFOsbRTkoJt"
   responseBodyBytes := []byte(responseBody)
   secretBytes := []byte(secret)
   // Create a new HMAC by defining the hash type and the key (as byte array)
   hash := hmac.New(sha256.New, secretBytes)
   // Write Data to it
   hash.Write(responseBodyBytes)
   responseBody2Signature := hex.EncodeToString(hash.Sum(nil))
   sha := strings.Replace(responseBody2Signature, "-", "", 0)
   sha = strings.ToLower(sha)
   result := sha == signature
   return result
}
Postman Collections
Each domain specific subsection will provide you with a set of postman collections, for you to explore our endpoints prior to implementation.
Please refer to 'the Postman Collection' menu under each section to get the corresponding postman collection.
Code Samples
Our Code Samples page shows how do several common integrations with our APIs in a variety of programming languages.
- PIS API -
Introduction To PIS
To get access to the Ecospend Gateway Sandbox environment you first need to apply via the enrollment form.
The first part of this section gives a step-by-step explanation of the payment flow.
The second part presents the swagger documentation for our endpoints and provides the postman collection required to explore the endpoints.
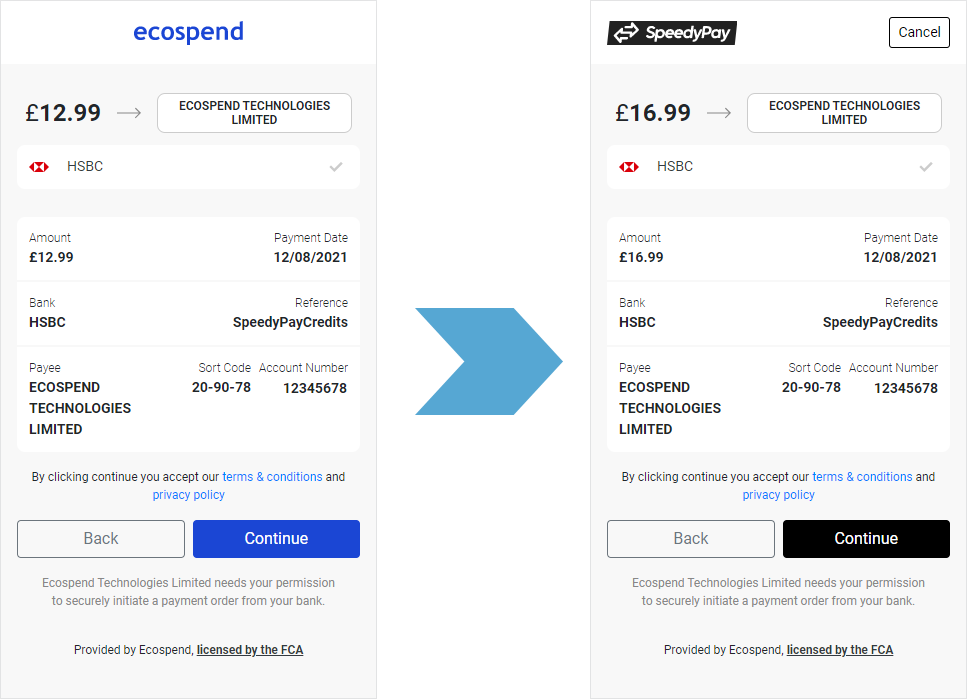
PIS Consent Page
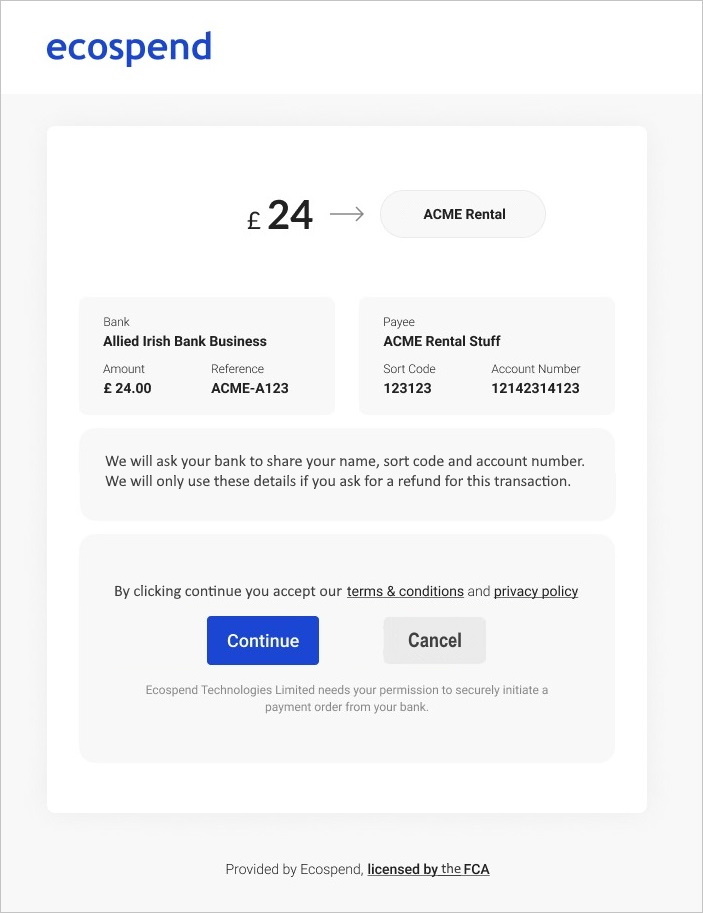
According to the OBIE Customer Experience Guidelines (OBIE CEG), a consent page must be displayed to the PSU so they can see the details of the payment and accept the terms before they are redirected to their bank for the authorization of the payment.
This consent page (optionally including the bank selection step) can be provided by Ecospend or you can implement it yourself. The Ecospend Gateway offers a whitelabel Paylink solution which combines the consent and the full user journey together.
The consent page must present the following information and functionality to the PSU:
Our recommendation is to follow the OBIE guidelines. However, there are different implementations and user journeys in the market. Some businesses prefer to put the consent wording into one of the existing steps and eliminate the separate consent page.
Below is a sample consent page.
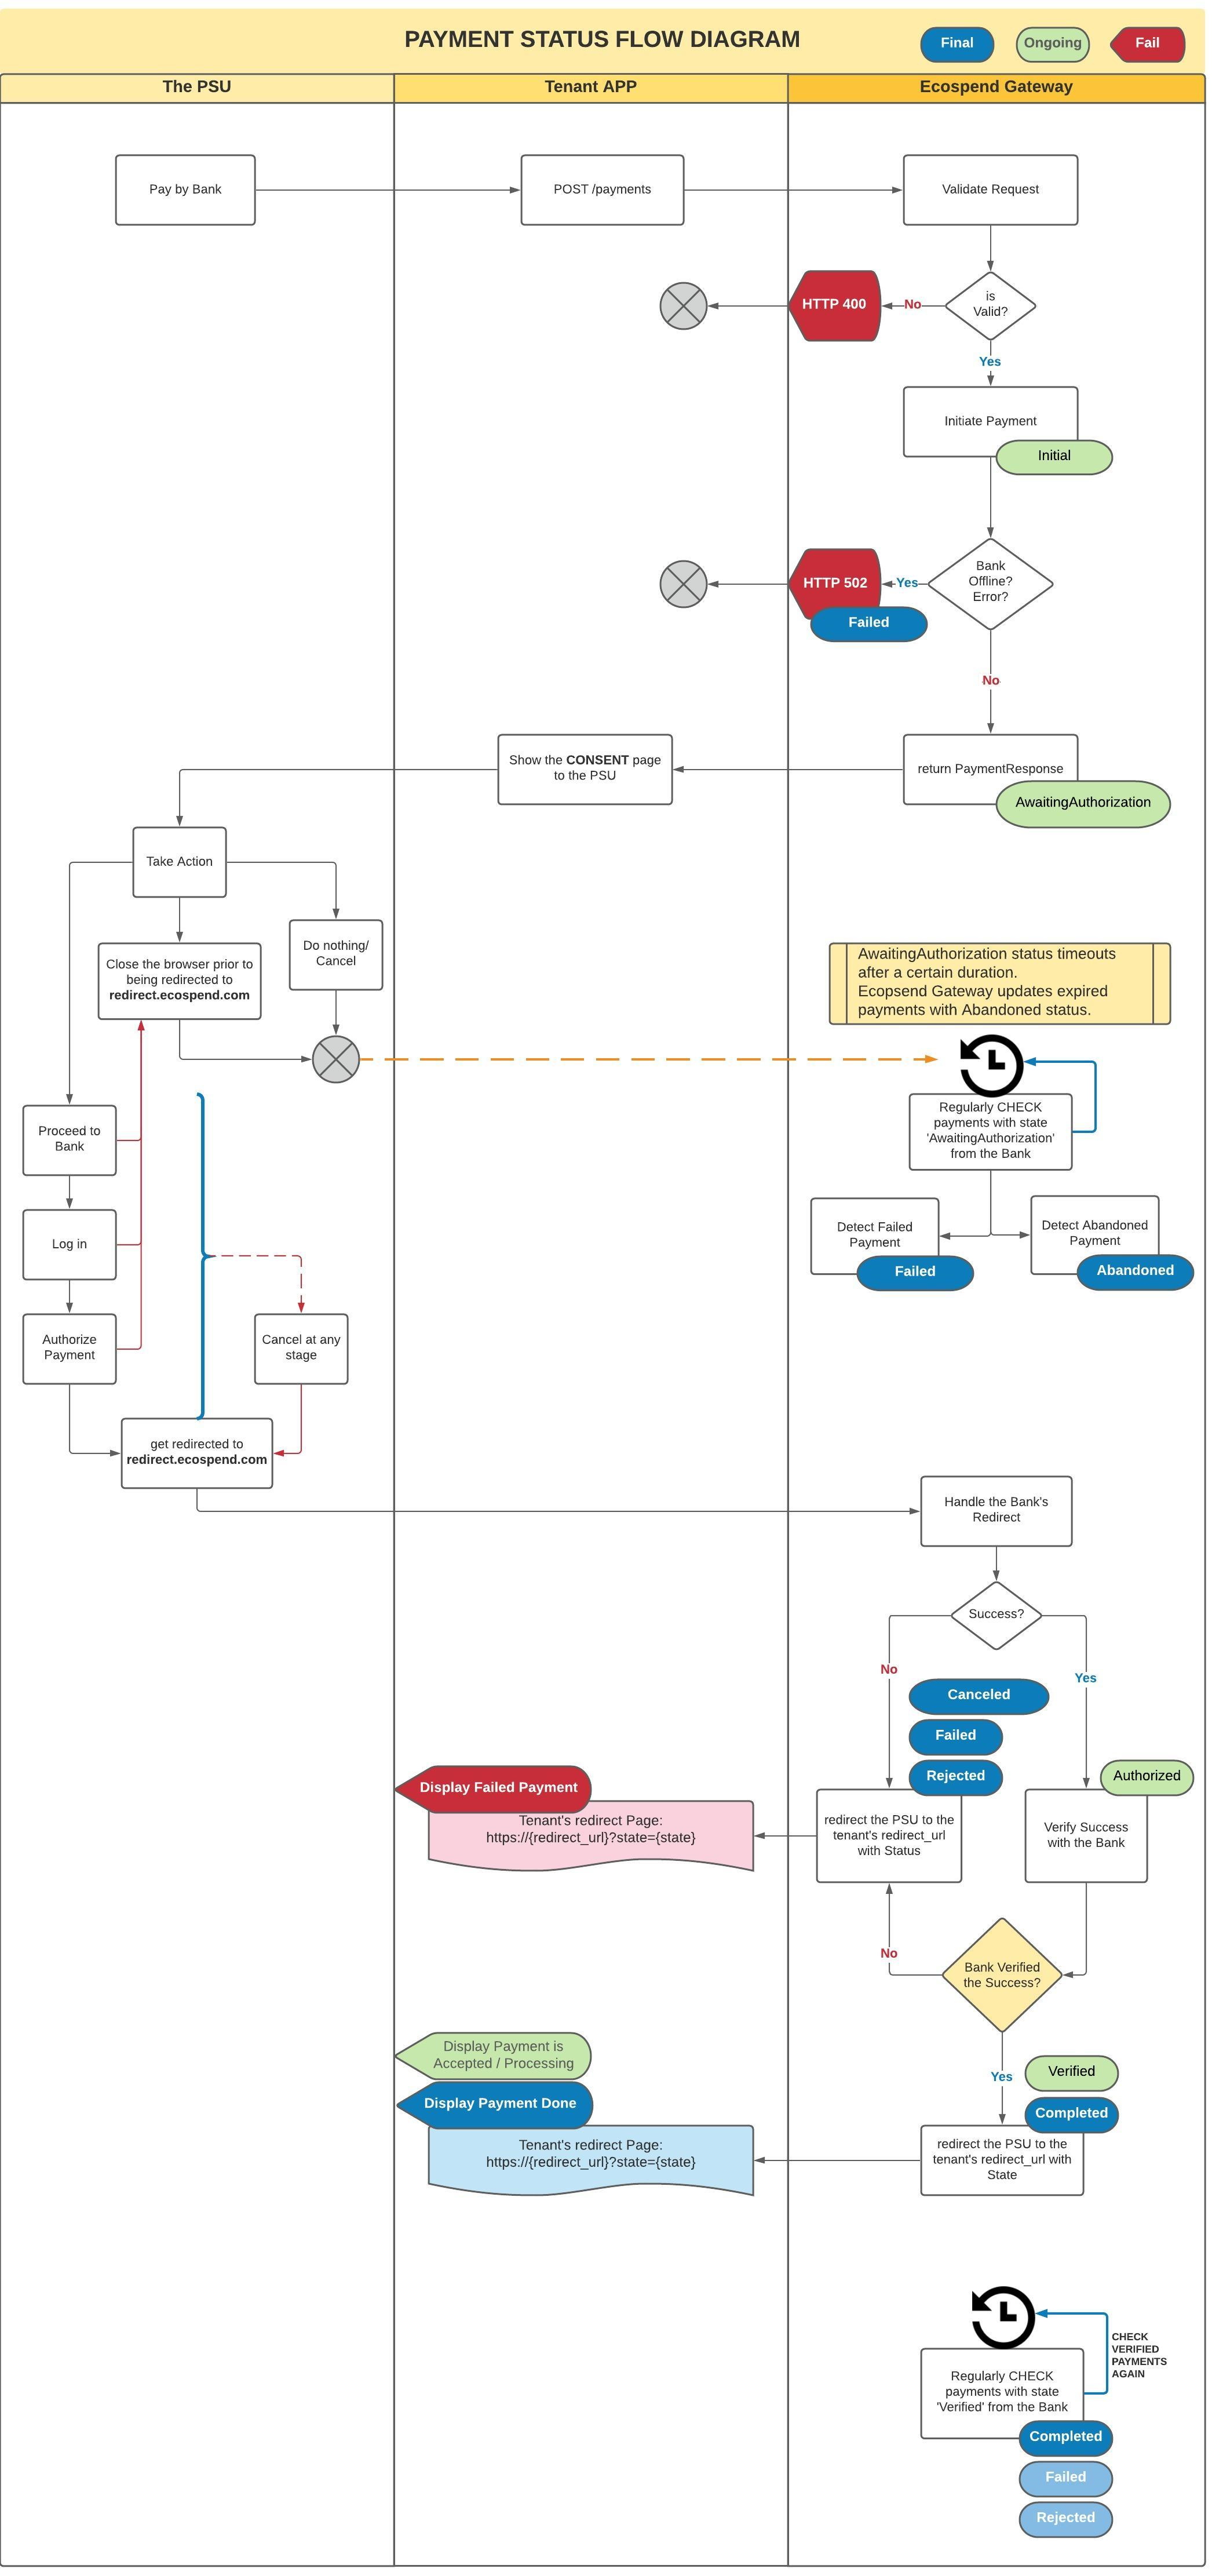
Payment Statuses
Once a payment is initiated it is tracked by the Ecospend Gateway to provide a seamless journey for the PSU.
Any status update is reflected on the payment data and a historic trail of each status change is stored within our system.
You can get the up to date status of an initiated payments by;
Polling the GET /payments/{payment_id} endpoint
Setting up a webhook endpoint on your system to get immediate updates on the payment status changes.
Remarks
- The Initital and Authorized statuses are returned only when you poll the payments endpoint.
- If the PSU abandons the payment journey, the payment will be in the AwaitingAuthorization status only for several minutes. After that, the status will be changed to Abandoned.
- The Failed / Rejected / Canceled statuses will be returned with a message query parameter indicating the reason for the negative payment journey.
The payment user journey in open banking is decoupled and has several paths it can take depending on the user's actions.
The diagram below details all possible paths and status changes for any payment initiation.
Implementation Instructions
This section of the documentation details step by step implementation instructions. Each subsection will refer to user flows, required endpoints and include any additional remarks.
Payments
Domestic instant payments, international payments, and scheduled payments are all accomplished from the same /payments endpoint. Using a different country in the debtor or creditor accounts will automatically trigger an international payment. Setting the scheduled_for parameter will automatically trigger a scheduled payment
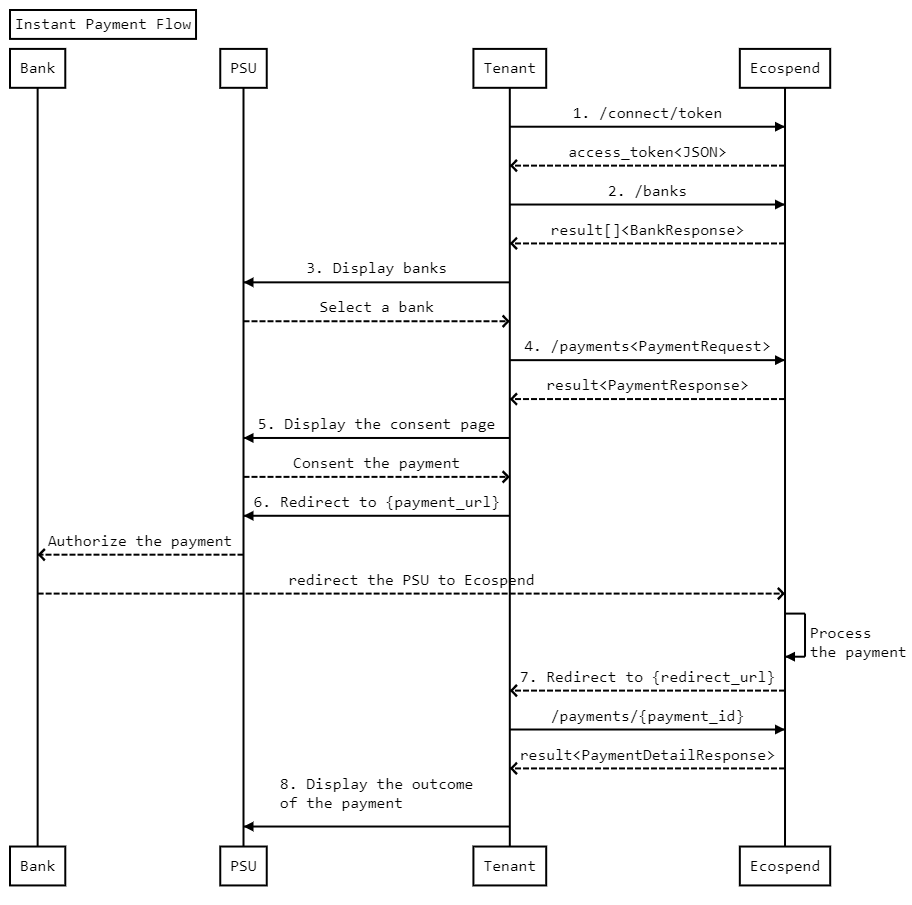
Instant Payments
A typical domestic instant payment will have the following steps (Note: Slight differences may occur depending on how the Tenant configures the user flow.
-
Authentication: /connect/token:
The initial step for all API services (including a payment initiation) is Authentication. This is achieved by calling the /connect/token endpoint.
A successful authentication will return an Access Token (access_token), which needs to be included with all subsequent requests.
-
List of available banks: /banks
The next step is to fetch the list of available banks with the /banks endpoint. Our system regularly checks the status of each bank and only returns the ones that are available at the time of that check. If you choose to cache the bank list, we would recommend that you refresh it regularly (once every hour, for instance).
-
PSU's bank selection:
In this step, you need to present a list of banks to the PSU for them to pay with.
-
Payment Initiation: /payments
A sample request message for an instant domestic payment is provided in the Payments section. There are several points to keep in mind when issuing a payment request:
- If DebtorAccount information is submitted within the PaymentRequest, the ASPSP will use this as the debtor account and will not allow the PSU to choose a different account from which to make the payment. This ensures that the payment is made from the provided DebtorAccount.
- The provided redirect_url must be pre-registered on the Management Console or an error will be returned.
- If the selected bank's services go offline within the timeframe between Step.2 and Step.4, an error message indicating the offline status of that bank will be returned so that you can ask the PSU to select another bank or try again.
-
Display the payment consent page:
The /payments endpoint will return a Payment URL (payment_url) from the PSU's bank. You need to redirect the PSU to this URL for them to authenticate to their bank and authorise the payment. But before redirecting the PSU to this URL, you are required to display a payment consent page as detailed under the Consent Page section.
-
Redirect the PSU to the Payment URL:
After a user consents to continue to their bank, you should redirect the PSU to the payment_url provided as a part of the PaymentResponse.
After that, the process goes on between the PSU and their online banking system. Despite slight differences between banks, in principle, the PSU logs in to their bank's system, sees the payment details and then authorises or cancels the payment. They can also abandon the process without completing the process.
After completing the authorization process at their bank, the PSU will be redirected to Ecospend's redirect URL. The Ecospend Gateway will immediately retrieve the status of the payment from the bank. Ecospend will then send the PSU back to your redirect_url with the payment status.
-
Handle the redirect:
The Ecospend Gateway will redirect the PSU to your redirect_url with the following query parameters:
- Payment Id (payment_id): Same identification value returned as the id field of the PaymentResponse.
- [Optional] Bank Reference Id (bank_reference_id): The unique identifier assigned to the payment instruction by the bank.
- Status (status): The status of the payment, being one of the followings:
- Verified: The ASPSP has authorized and accepted the payment for processing. The payment is not completed yet, it has not been sent through the corresponding payment rails. The payment can still be rejected by the ASPSP.
- [final] Completed: The Payment is considered complete when the payer's ASPSP has sent the payment through the corresponding payment rails to be credited to the payee account.
- [final] Canceled: The PSU has cancelled the payment flow.
- [final] Failed: The Payment flow has failed due to an error.
- [final] Rejected: The ASPSP has responded with a 'rejected' status for the payment.
- [Optional] Message (message): 'message' query parameter is a string value representing the reason for a canceled/rejected/failed payment. For verified/completed payments this query parameter will not be present.
- [Optional] Merchant ID (merchant_id): If the related record was POSTed (created) with a 'merhant_id', that value will be a part of the redirect url within the query parameter 'merchant_id'.
- [Optional] Merchant User ID (merchant_user_id): If the related record was POSTed (created) with a 'merhant_user_id', that value will be a part of the redirect url within the query parameter 'merchant_user_id'.
- [Optional] Additional Params: If the related record was POSTed (created) with 'additional_params' field, the value assigned will be a part of the redirect url prefixed with an '&' (ampersand).
-
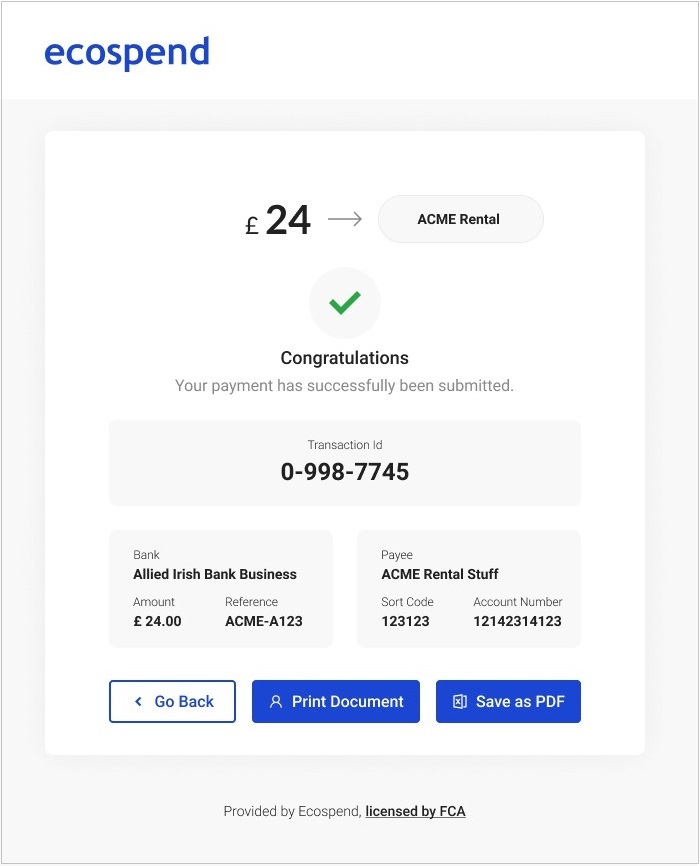
Present a payment result page to inform the PSU:
If the payment journey has been successfully completed by the PSU (the status is either Verified or Completed), you must display the following information to the PSU:
- Bank reference id
- The payment status
- Refund account information of the PSU (if it was requested)
Remark
If you have initiated the payment with payment_option.get_refund_info=true and the payment status is either Verified or Completed, you will have to call the endpoint /payments/{payment_id} in order to fetch the refund account information of the PSU.
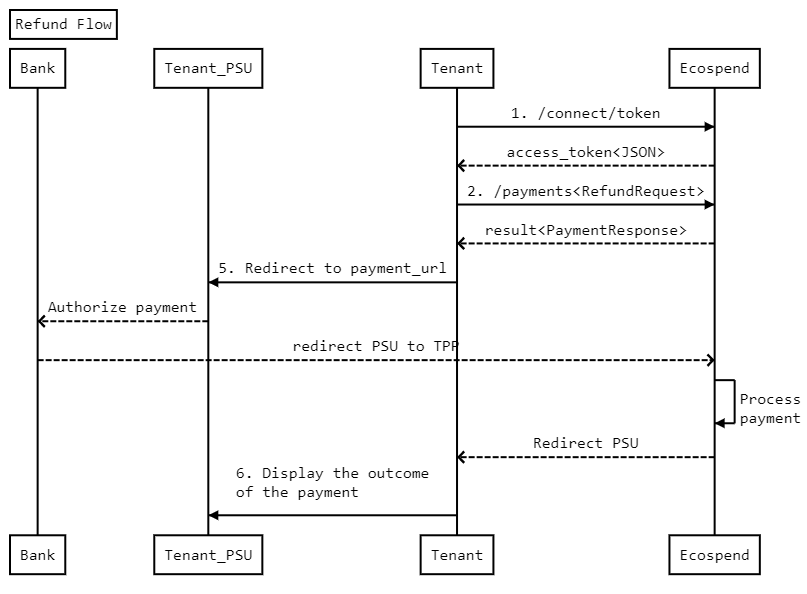
Refund
The Refund feature is a sub-endpoint of the /payments endpoint that can be accessed via:
|
/payments/{payment_id}/refund
example: /payments/00000000-dcdd-4ee6-9fc2-6b119fa53fb0/refund |
Only payments made through the Ecospend Gateway can be refunded.
Because a refund is a reverse payment (from the tenant to the PSU), the authorisation of this payment is done by the tenant.
Technically, a refund is a payment for which you normally don't need to provide the debtor account. This information will be automatically populated from the original payment using the payment_id that you provide in the URL when calling the refund. For this to work, the get_refund_info parameter of the original payment request must have been set to true. Otherwise, the debtor account number will not have been provided by the bank.
Remarks
• The refund_account information is not mandatory provided that the original payment has been initiated with payment_options.get_refund_info=true.
• If refund_account information is provided, then our system will use this instead of the debtor account of the original payment.
• The amount value cannot be more than the amount of the original payment.
Scheduled Payment
Similar to an instant payment, a scheduled payment can be initiated by calling the /payments endpoint. The only difference is you need to set a value for the payment_options.scheduled_for parameter of the payment request. It must be set to the next day or later.
Please refer to the steps and the technical information described under Instant Payment for other details.
Standing Order
The Ecospend Gateway provides a dedicated /standing-orders endpoint to set up standing orders in the UK. Both the technical integration flow and the user journey steps are identical to Instant Payment, but the parameters differ.
Remarks
• Currently the only supported currency is GBP.
• Standing orders can only be set up with a starting date of at least 3 working days later than the current date (determined by the first_payment_date parameter of the StandingOrderRequest).
• Standing orders can be set up weekly or monthly with the frequency_type parameter being assigned one of the two values; DayOfWeek, DayOfMonth. The integer value for the parameter frequency determines which day of the week or month to be used for recurring payments.
• Instead of the payment_url (that comes with the /payments endpoint), the /standing-orders endpoint will return a standing_order_url. The PSU should be redirected to this URL for authorisation.
Varying Recurring Payments (VRP)
1. Introduction to VRP
Variable Recurring Payments (VRPs) let customers safely connect authorised payments providers to their bank account so that TPPs can make repeated payments on the customer’s behalf, in line with agreed time and amount limits*. VRPs offer more control and transparency than existing alternatives, such as Direct Debit payments. There are two usages of VRPs;
- Sweeping (me-to-me payments); The automatic transfer of money between a customer’s own accounts, such as moving surplus funds into a separate savings account or using them to repay a loan or overdraft to cut the cost of borrowing.
- User-to-merchant; the user authorises a VRP order in which the beneficiary is a merchant. An example would be monthly subscription payments.
• VRP limits may vary depending on the user’s bank or the user’s account specifications. Please contact your account manager for further details.
The first step of the VRP flow is getting the PSU's authorization. After the authorization is granted, the Tenant makes API calls to Ecospend to execute one more payments from the PSU’s account to predesignated Creditor Account.

2. Implementing a Sweeping Solution
Since Sweeping enables the automatic transfer of money between a PSU’s own accounts, the accounts must have the same account holder name. Hence before the Sweeping setup can be initiated, it is important to explain to the PSU that the sending and receiving bank account’s should be registered under the ‘SAME LEGAL NAME’.
* Ecospend does not have visibility into the names used in the accounts until the last step. As a result, it is possible for a PSU to go through the entire flow to set up a sweep only to be rejected at the end. Therefore, it is important to emphasize this requirement to the PSU before they begin their journey.
The Ecopsend Gateway provides two technical flows for tenants to implement a Sweeping solution:
-
A Pure API solution, in which the Tenant uses Ecopsend’s REST APIs and implements their own UI for the flow.
- The tenant is to provide at least the Creditor Account within the initial request in order to start the flow.
- Considering that the ‘Creditor Account’ must be the PSU’s own account, tenants can make use of the the Ecospend Gateway’s AIS Consent APIs in order to gather this information, please see AIS Consent flow.
- Any UI interaction resource and flows will be provided by the Tenants in order to fulfil an Open Banking compliant user journey.
-
Ecospend’s VRPLink solution, in which the Tenant will only need a single API call to initiate the Sweeping authorization flow, and all the UI interactions with the PSU will be handled by the Ecospend Gateway.
- The tenant is not required to provide any PSU account information, the VRPLink flow will guide the PSU to necessary sub-journeys when required.
- All of the screens will be rendered and displayed to the PSU by the VRPLink. At the very end of the journey the user will be redirected to the Tenant’s {redirect_url}.
- VRPLink screens support various customizations and can be rebranded according to the Tenant’s preferences, please see Branding support
2.1. Pure API Solution
As mentioned above, the Pure API solution is suitable for tenants that prefer to implement and host the Sweeping setup screens under their domain. To create a complete solution, the tenants will be required to gather the PSU’s Creditor Account information prior to the Sweeping setup flow which can be implemented by making use of the Ecospend Gateway’s AIS Consent Flow.
The sequence diagram below details how the AIS Consent flow should be coupled with the Sweeping API to create a complete Sweeping solution.

2.2. VRPLink Solution
Like Ecospend Gateway’s other Paylink solutions, VRPLink is a white labelled web application hosted within the Ecospend Gateway, which guides the PSU to complete a Sweeping setup flow seamlessly. The VRPLink flow covers any condition, even when the tenant does not possess any account information about the PSU.
The flow can be altered according to the request parameters;
-
{bank_id}: Providing the bank identifier is possible when the tenant knows the PSU’s bank prior to VRPLink creation. In case this value is provided, the PSU will be skipping the ‘Bank selection for the VRP Authorization’ subflow.
-
{verify_creditor_acount}:: bool: When set true, the PSU will be required to run through an AIS Consent Flow for the system to collect the details of the Creditor Account Information directly from the bank. (In such cases, if tenant provided the request. {creditor_account} value, it will be overwritten by the value fetched from the bank.
-
{verify_debtor_acount}:: bool: When set to true, the PSU will be required to run through an AIS Consent Flow for the system to collect the details of the Debtor Account Information directly from the bank. (In such case, if the tenant provided the request.{debtor_account} value, it will be overwritten by the value fetched from the bank.
-
{verify_creditor_acount} AND {verify_debtor_acount}: When both are set true, the Account Name comparison will take place before the bank journey. If either one has not been provided the Account Name comparison will take place after the bank journey.
-
{verify_debtor_acount} OR {debtor_account}: When either {verify_debtor_account} is set to true or {debtor_account} is provided within the request, the PSU will not be able to select a bank account in the banking application, within the VRP Authorization Subflow. (Step.36)
The sequence diagram below details the usage of VRPLink to create a Sweeping solution:

3. Implementing a VRP (PSU-to-Merchant) Solution
VRP non-sweeping flow enables a viable solution of programmatic money transfers from the PSU to a merchant. An example scenario would be subscription payments.
* Compared to sweeping scenario, VRP flows have less requirements but similar flow.
Like the sweeping scenario, the Ecopsend Gateway provides two technical flows for tenants to implement a VRP solution:
-
A Pure API solution, in which the Tenant uses Ecopsend’s REST APIs and implements their own UI for the flow.
- he tenant is to provide at least the Creditor Account within the initial request in order to start the flow.
- Any UI interaction resource and flows will be provided by the Tenants in order to fulfil an Open Banking compliant user journey.
-
Ecospend’s VRPLink solution, in which the Tenant will only need a single API call to initiate the Sweeping authorization flow, and all the UI interactions with the PSU will be handled by the Ecospend Gateway.
- Like the PURE API solution, the tenant is to provide at least the Creditor Account within the initial request
- The tenant is not required to provide any PSU account information, the VRPLink flow will guide the PSU to necessary sub-journeys when required.
- All of the screens will be rendered and displayed to the PSU by the VRPLink. At the very end of the journey the user will be redirected to the Tenant’s {redirect_url}.
- VRPLink screens support various customizations and can be rebranded according to the Tenant’s preferences, please see Branding support
3.1. Pure API Solution
As mentioned above, the Pure API solution is suitable for tenants that prefer to implement and host the VRP setup screens under their domain.
The sequence diagram below details how to implement the Pure API based VRP solution.

3.2. VRPLink Solution
Like the Ecospend Gateway’s other Paylink solutions, VRPLink is a white labelled web application hosted within the Ecospend Gateway. The VRPLink guides the PSU to complete a VRP setup flow seamlessly. This flow covers any condition.
The flow can be altered according to the request parameters;
-
{bank_id}: Providing the bank identifier is possible when the tenant knows the PSU’s bank prior to the VRPLink creation. In case this value is provided, the PSU will be skipping the ‘Bank selection for the VRP Authorization’ subflow.
-
{debtor_account}: When {debtor_account} is provided within the request, the PSU will not be able to select a bank account in the banking application within the VRP Authorization Subflow. (Step.36)
* Non-sweeping VRPLink implementation does not make use of the verify_creditor nor the verify_debtor request parameters. If any of those parameters are a part of the request the response will be HTTP400:Invalid Request
The sequence diagram below details the usage of VRPLink to create a VRP solution

Fetching Payments and Standing Orders
You can query /payments for previous payment transactions, and /standing-orders for previous standing orders. There are six query parameters that can be used to filter the result set:
- merchant_id
- merchant_user_id
- start_date
- end_date
- page
A single record can be fetched by calling
|
GET /{ endpoint }/{ record_id } |
Multiple records can be fetched by calling
|
GET /{ endpoint }?{ param1 }={value}&{ param2 }={value} |
for example:
|
/payments?start_date= 2021-01-01T00:00:00.000Z& end_date= 2021-02-01T00:00:00.000Z |
Multiple records will always be returned in pages. The maximum number of records per page is 100. You will need to iterate through pages to fetch all data if there are more than 100 records.
|
{ "data": [ list of fetched record type ], "meta": { "total_count": 211 , //Final total number of records "total_pages": 2 , //Total number of pages "current_page": 0 //Current result page index (starting from 0. } } |
Banks
The /banks endpoint provides the list of banks that are currently online. Using our Management Console you can turn the visibility of banks on or off.
You can also limit the banks by providing query parameters. The following example returns all available banks that provide domestic payment services.
|
GET /banks?purpose=domestic_payment |
Available parameters are:
| Parameter | Description | Options |
|---|---|---|
|
purpose |
Get a list of banks according to the 'purpose' of your operation. |
DomesticPayment |
|
is_sandbox |
Get a list of sandbox banks by setting the value to 'true'. |
true |
|
division |
Get only the banks with a specific division type. |
Personal |
|
standard |
Get a list of banks that implement the specified open banking standard. |
OBIE |
|
country_iso_code |
Get a list of banks registered in the specified country. |
|
|
group |
Get the member banks of a specific group or logical groupings. |
CMA9 |
|
page |
An integer value to get a specific page of the result set. |
Integer > 0 |
Refer to the API Specification for details of the BankResponse model.
Payment Webhooks
Any payment requests you initiate are tracked and monitored by our system for their status changes. After any status change (except Initial or AwaitingAuthorization) on the payments your webhook endpoint is called.
Please refer to Webhook Documentation for the technical specifications.
Postman Collection & Code Samples
We have created a postman collection to ease the process of testing and integrating with our APIs.
Click this link to download our latest Postman collection.
Please visit our Code Samples page to see how to obtain payment in various programing languages.
- AIS -
Introduction to AIS
Ecospend Gateway is a pure open banking based SaaS solution that will easily enable you to enhance your platform with open banking functionality.
Ecospend Gateway Account Information Services (AIS) provide REST API endpoints, whitelabel supporting UI elements and value added services to enrich banking data with Transaction Categorization and Data Aggregation.
This document aims to guide development teams while integrating with the Ecospend Gateway. While the first section explains the user journeys and technical highlights of each feature, the second section provides a detailed swagger documentation of the Ecospend Gateway endpoints.
Consent UX
In order to access a PSU's bank account information, the very first step is to implement the consent journey. It is the user journey where the PSU must clearly understand the reason(s) for accessing the data, duration of the access, scope of the data that will be accessed and any other compliance requirements set by the GDPR for your use case.
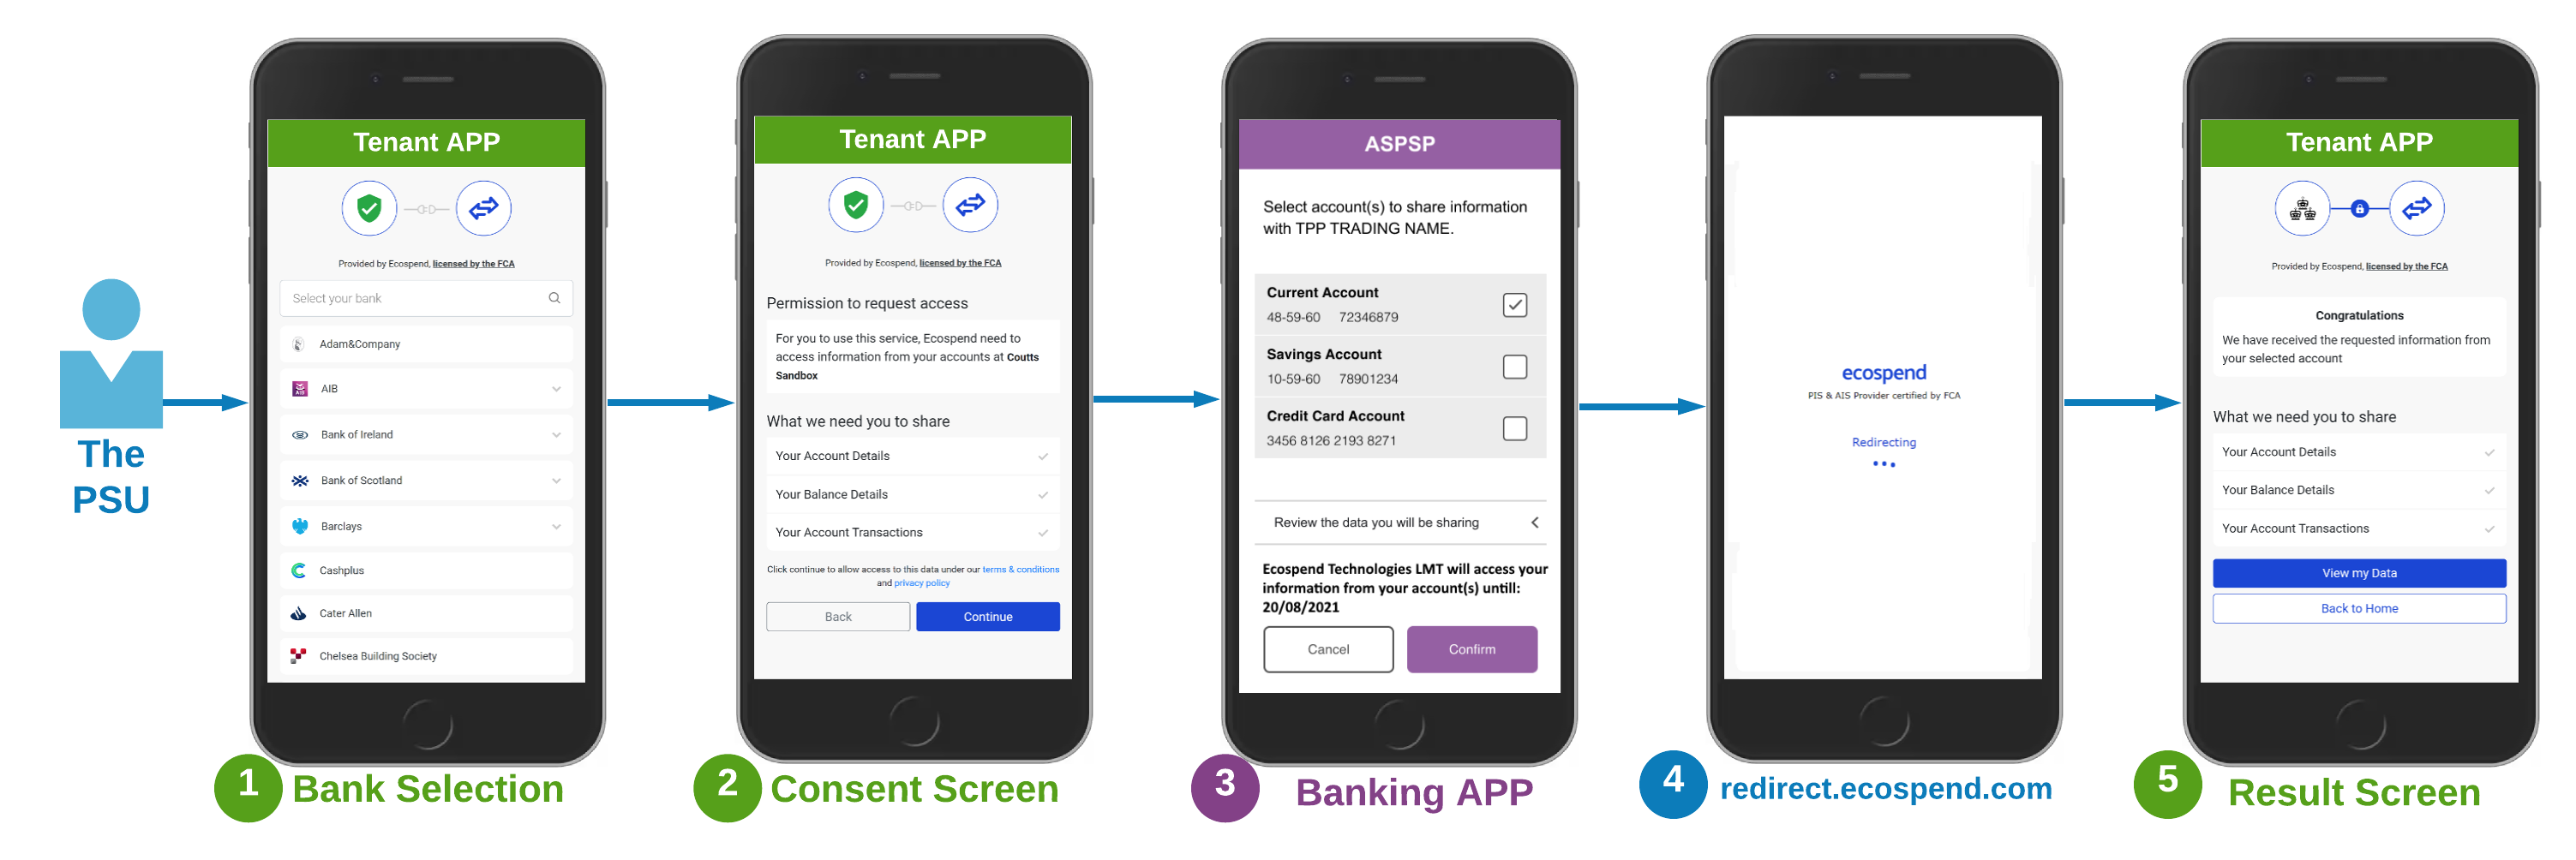
The consent journey you will implement will consist of UIs presented on different domains (The Tenant, The Bank and Ecospend) via 3 redirects. Diagram below demonstrates a sample UX for the consent journey and the section below explains each step in detail:
Click on the diagram to see it in full size.
Ecospend implements and guides its tenants to implement the The OBIE Customer Experience Guidelines (OBIE CEG)
-
Bank Selection: One of the supported banks must be selected by the PSU. This will require you to implement a bank selection UI that lists the banks available to your client_id via /banks endpoint [Remark] If your journey already determined the PSU's bank then this UI is not required. Nevertheless you will require to provide the bank's 'id' that is assigned by the Ecospend Gateway to be able to call the POST /consents endpoint.
-
Consent Screen: This is a mandatory UI that must include all the fields defined in the OBIE CEG.
-
Mention Ecospend: The PSU must be aware that the TPP that will be accessing their data is Ecospend.
-
Explain the reason: A clear text explaining why the PSU will need to allow access to his/her bank account information. Reason for accessing each different data scope ("Account" "Balance" "Transactions" "DirectDebits" "StandingOrders" "Parties" "ScheduledPayments" "Statements") must be explained in this section.
-
List the data scope: The data scope of the consent that will be initiated must be listed for the PSU to review. The supported data scopes are listed under permissions field of POST /consents endpoint.
-
Define duration: How long the data will be accessed must be clearly presented to the PSU.
-
Mention the bank: The name of the bank that the PSU will be redirected from this page must be displayed.
-
Provide 'Cancel' option: The PSU must be provided with an option to cancel the consent journey.
* The 'cancel' option CAN NOT be less visible than the option to 'continue'.
[Remark] We do recommend that you call the POST /consents endpoint prior to displaying this page. This will enable you to present a better user experience before the PSU reading through all the information on the consent page and continuing to the banking application:
The user will be instantly redirected to the banking application after hitting continue (since the Ecospend API call is complete and the bank_consent_url is already gathered).
If the bank API is currently not available the user may be presented to select another bank or retry.
-
-
The Banking Application: The PSU must be redirected to the bank_consent_url to complete the authentication and authorization steps of the consent journey. The user experience will change depending on:
whether the PSU is currently using his/her mobile device and
-
whether the mobile banking application is installed and supporting universal links. [Remark] Bear in mind that, mobile operating systems provide users with the option of choosing default applications to launch for each URL. In case the PSU disallowed the banking mobile app to handle URLs, the app journey will not launch and the PSU will continue to web journey on the mobile device.
-
redirect.ecospend.com: After completing the steps on the banking application, the PSU will be automatically redirected to Ecospend Gateway's redirect page. This page is called by the banking system with a set of parameters in order to Ecospend Gateway to collect the token required for access to the PSU's bank account information.
[Remark] At this point the Ecospend Gateway executes calls with the bank APIs and fetches the following information of the PSU's bank account prior to redirecting the PSU back to your redirect_url.
Accounts: The bank account information(s) selected by the PSU during his/her bank authorization journey.
[Optional] Balance: Depending on whether you have requested the permission to access 'balance' information each accounts' current balance information.
[Optional] Parties: Depending on whether you have requested the permission to access 'parties' information, account holder information(s) for each selected account.
- Result Screen: This UI must inform the PSU about the outcome of the consent journey whether the consent journey is completed successfully or failed.
Technical Flow
The sequence diagram below visualizes the API endpoint integrations required to implement the consent journey. These steps require implementations of each step on your side, including the UIs:
Click on the diagram to see it in full size.

-
Get Access Token: Call POST /connect/token endpoint with the provided client_id and client_secret to retrieve the bearer token required for each consecutive call.
-
Get Banks: Call GET /banks endpoint to retrieve all available banks.
[Remark] 'group' information of the response enables you to build a user friendly bank list by grouping related bank connections (ex: Barclays personal, Barclays Business, Barclays Mobile Personal have different bank connections, hence different bank ids but their group information will be 'Barclays').
[Remark] Notice the 'service_status' information of the response which indicates wheter the bank API is currently available.
[Remark] Notice the 'abilities' information of the response which indicates what is the supported data scope by the bank. If the following call to the POST /consents endpoint requests a permission that is NOT supported by the bank, you will get an error.
-
Bank selection screen: The PSU must have an option to choose his/her bank on your UI. If your flow already determined the PSU's bank this UI is not required.
-
Get consent URL: Call POST /consents endpoint to get the bank_consent_url that the PSU will be redirected to authorise the consent.
[Remark] The response returns bank_reference_id which is the identification of the consent that is assigned by the bank APIs.
[Remark] bank_consent_url will be a pretty long URL which packs all the information required by the bank. If within your journey you want to display a QR code or send this url to the PSU via SMS we recommend that you make use of the Datalink.
-
The consent screen: Implement a UI for the consent screen as described in the section The Consent UX.
-
Redirect the PSU to the bank: The PSU must be redirected to the bank_consent_url.
-
The bank journey: The PSU must follow the steps on his/her banking application to authorize the consent request.Upon completing the bank journey, the PSU will be automatically redirected to redirect.ecospend.com.
-
Consent processing: While the PSU is on redirect.ecospend.com, Ecospend Gateway makes a series of Bank API calls, in order to:
-
Verify that the consent authorization is completed and a token is available for Ecospend Gateway.
-
Fetch the core account information data that includes:
Selected bank account(s) details
Balance information (if requested)
Parties information, which provides the account holder(s) legal name(s) (if requested)
-
-
Redirecting the PSU to your {redirect_url}: Next, the Ecospend Gateway will redirect the PSU to your specified {redirect_url} with the query parameters explained below:
-
consent_id : The identification of the consent object assigned by the Ecospend Gateway.
[Remark] The consent_id will be required for the very first GET operation to fetch the account(s) within the scope of the consent journey. -
status : The outcome of the consent journey is determined according to this value. Possible values are:
authorised : The consent request has been successfully authorized by the PSU and the bank provided required token to fetch account information.
canceled : The PSU has chosen to 'cancel' the consent journey on the banking application.
failed : The consent request has failed on the banking application.
rejected : The consent request was rejected by the bank. -
bank_reference_id [Conditional] : The consent identification information assigned by the bank.
[Remark] Available if the status is authorized. -
message [Conditional] : Explanation for the negative outcome of the consent journey.
[Remark] Available if the status is NOT authorized.
[Remark] If an error message is returned from the bank APIs, Ecospend Gateway will proxy that message. -
failure_code [Conditional] : Detailed reason regarding the unsuccessful consent journey.
[Remark] For the details, please see related documentation.
-
-
Result screen: You must implement a UI to inform the PSU about the outcome of the consent journey.
Possible Redirect Outcomes
Redirect URL
{redirect_url}?status={status}&consent_id={consent_id}&message={message}&failure_code={failure_code}
| Message | Failure Code | Status | Note |
|---|---|---|---|
| The consent was canceled by user. | canceled | Canceled | If the consent is canceled by the user. |
| The consent authorization was rejected by the bank. | rejected_consent | Rejected | If the consent is rejected by the bank after the user authorises it. |
| Consent could not be processed by the bank. | not_authorised_consent | Failed | If an error occurs unexpectedly during the redirect due to a bank error. |
| Configuration exception. | other | Failed | If an error is caused by bank configurations. |
| Unexpected exception. | other | Failed | If an unexpected error occurs in the system. |
| The bank's APIs encountered an error and can not respond to your request at the moment. | bank_api_exception | Failed | If the token exchange request to the bank is unsuccessful. |
| Accounts could not be fetched | bank_api_exception | Failed | If the accounts cannot be fetched due to an error caused by the bank. |
| Balances could not be fetched | bank_api_exception | Failed | If the balances cannot be fetched due to an error caused by the bank. |
| No Current Account available for this consent | no_current_account_selected | Failed | If the request includes "allowed_account_type": "current", this rule will be applied. |
| Your total connected account count is limited as {0} but you have connected {1}. | multiple_account_selected | Failed | If the number of connected accounts is to be limited, this rule will be applied. |
| Your account type must be one of the following: IBAN, BBAN, SortCode AccountNumber. | invalid_account_type | Failed | The account type must be one of the following: IBAN, BBAN, Sort Code Account Number. |
Datalink
Datalink is a whitelabel consent journey solution provided by Ecospend that downsizes the required implementation for the consent journey to a single endpoint integration. By making a single call to /datalink endpoint you will be able to initiate the consent journey.
Datalink Features
Full Consent UX: Datalink implements and fully complies to all steps defined in the OBIE Customer Experience Guidelines (OBIE CEG) out of the box.
Customizable UI: All of the Datalink screens can be redesigned with your brand.
Customizable UX: The flow of the Datalink screens can be customized via request parameters and client specific configurations.
Financial View Option: Another unique feature of the datalink is to provide the PSU with three data screens to inspect their bank account summary, transactions and categorized view of the transactions. This feature can be enabled completely or partially by setting corresponding request parameters to true.
Enabling Async Consent Journey: The bank_consent_url that the banks provide has a validity duration of ~10 minutes. This means that the PSU must be redirected to the bank_consent_url within this period. With Datalink the start of this duration does not start until the PSU is redirected to datalink_url. This enables Datalink to be used to build asynchronous consent journeys. (Such as initiating a journey via email or printed materials sent to the PSU.
-
Decoupled QR Code Journey: The response will provide you with a QR Code image in base64 format representing the Datalink URL. QR Codes can be easily embedded in your applications, emails or printed materials.
[Remark] QRCode enables your journeys to transfer the authorization steps to the PSU's mobile device where the PSU can use his/her mobile banking app which will provide a much more robust and faster experience via biometrics or usage of a PIN.
Technical Flow
The sequence diagram below visualizes the API endpoint integrations required to implement the consent journey. These steps require implementations of each step on your side, including the UIs:
Click on the diagram to see it in full size.

Get Access Token: Call POST /connect/token endpoint with the provided client_id and client_secret to retrieve the bearer token required for each consecutive call.
Call Datalink: Call POST /datalink endpoint to create a datalink_url.
Redirect the PSU: The PSU can visit the datalink_url according to your use case. As mentioned earlier, datalink_url stays valid until it is deactivated.
-
Datalink UX: By default Datalink will guide the PSU through (1) bank selection screen and (2) Consent screen.
[Remark] If the bank_id is provided with the request then the bank selection screen will not be displayed.
[Remark] If the client configuration is set to skip the consent screen (your application MUST in that case), then the PSU will be directly redirected to the banking application.[Remark] If both bank_id is provided with the request and the client configuration is set to skip the consent screen, then the PSU will not be displayed any UI on Datalink. In this scenario Datalink will create the bank_consent_url and redirect the PSU to the banking application.
The bank journey: The PSU must follow the steps on his/her banking application to authorize the consent request.Upon completing the bank journey, the PSU will be automatically redirected to redirect.ecospend.com.
-
Consent processing: While the PSU is on redirect.ecospend.com, Ecospend Gateway makes a series of Bank API calls, in order to:
Verify that the consent authorization is completed and a token is available for Ecospend Gateway.
-
Fetch the core account information data that includes:
Selected bank account(s) details
Balance information (if requested)
Parties information, which provides the account holder(s) legal name(s) (if requested)
-
Redirect to Datalink: By default the PSU will be redirected to Datalink result screen where he/she will be informed about the outcome of the consent journey.
[Remark] If the auto_redirect is set to true in the request then the Datalink will not display any UI and the flow will continue as described in the next step.
[Remark] If the auto_redirect is set to false in the request then the Datalink will display the outcome of the consent journey. -
Redirecting the PSU to your {redirect_url}: Next, the Ecospend Gateway will redirect the PSU to your specified {redirect_url} with the query parameters explained below:
-
datalink_id : The unique identifier of the datalink.
-
consent_id : The identification of the consent object assigned by the Ecospend Gateway.
[Remark] The consent_id will be required for the very first GET operation to fetch the account(s) within the scope of the consent journey. -
status : The outcome of the consent journey is determined according to this value. Possible values are:
authorised : The consent request has been successfully authorized by the PSU and the bank provided required token to fetch account information.
canceled : The PSU has chosen to 'cancel' the consent journey on the banking application.
failed : The consent request has failed on the banking application.
rejected : The consent request was rejected by the bank. -
bank_reference_id [Conditional] : The consent identification information assigned by the bank.
[Remark] Available if the status is authorized. -
message [Conditional] : Explanation for the negative outcome of the consent journey.
[Remark] Available if the status is NOT authorized.
[Remark] If an error message is returned from the bank APIs, Ecospend Gateway will proxy that message. -
failure_code [Conditional] : Detailed reason regarding the unsuccessful consent journey.
[Remark] For the details, please see related documentation.
-
Continuous Access to AIS Data
An account information consents given by the PSU grants access to up to date data by the Ecospend Gateway for up to 90 calendar days.
After 90 days the consent expired and data becomes inaccessible. In order to continue accessing the data the PSU must run through the consent journey again.
The synchronization of the account data and prevent duplication can be troublesome after a new consent is granted for the same account after expiration.
To minimize the impact and provide a continuous data stream to our clients, the Ecospend Gateway provides both create consent and extend consent endpoints.
While create consent will create a new entity (even the account(s) granted access are the same of a previous consent, all the records related to the consent will have new identifications assigned.)
On the other hand extend consent endpoint only creates a new consent entry and account date under this consent will have immutable identifications assigned.
Fetching the Account Information Data
As a part of the consent journey, Ecospend Gateway instantly fetches Account Details, Party and Balance data. Any other data is fetched asynchronously.
Depending on the requested Account Access Permissions setting, Ecospend Gateway SYNC service queues any AIS data for the first fetch, right after the completion of the consent journey
You can retrieve any of the account information data via corresponding GET endpoints. In addition to standard GET endpoints, Ecospend Gateway AIS API also provides value added endpoints for Categorized Transactions endpoint and a financial overview endpoint.
[Remark] In compliance with the Open Banking regulations -without the PSU present- the account information data is refreshed every 6 hours after the initial data fetch.
This period can be modified for scenarios where the PSU will be present.
[Remark] As a part of the consent journey, Ecospend Gateway securely stores the Account Access Token to periodically fetch account information data.
Account Assessment
Ecospend Gateway has the capability to assess an account using tenant-specific custom algorithms to provide a clear FAIL/PASS outcome based on your business requirements within seconds. This feature can be activated simply by setting the ‘creation_reason’ field of the /consents endpoint request to 'Algorithm'. The Ecospend Gateway then handles the rest of the process.
The outcome of the Account Assessment is accessible through the Management Console and via webhook notifications, which are sent immediately after the assessment is completed.
The sequence diagram below illustrates the process flow of the Account Assessment:

[Remark] This feature is only available to our tenants after a custom setup procedure. Please contact your account manager for further details.
[Remark] You will receive a HTTP400 response if your set up for this feature is not present.
Data Refresh Webhooks
Whenever new account information data is fetched from the bank your webhook endpoint will be called with the corresponding parameters.
Please refer to Webhook Documentation for the technical specifications.
Postman Collection
We have created a postman collection to ease the process of testing and integrating with our APIs. Click this link to download our latest Postman collection.
- PAYLINK -
Introduction to Paylink
The Ecospend Gateway presents Paylink as an alternative and easier form of Open Banking Instant Payment solution. Paylink provides you the option of downsizing the development effort for a PIS journey to a single endpoint integration. Paylink undertakes all of interaction in the payment user journey with your branding on display.
Paylink also features an embedded notification system, which can send out the Paylink url's to your users via email and SMS, again with your branding.
On top of those features, Paylink allows you to customize the user payment journey according to your use case.
Paylink Features
Partial Payments
By default, a Paylinks are created for the amount specified by the Tenant. However, with Paylink, it is possible to allow PSUs to make payments below the requested amount. This is accomplished by setting paylink_options.allow_partial_payments=true in the request parameters.
Limit Settings
Paylink supports 3 request parameters that work simultaneously to enable different limits the number of payments that can be initiated with a single Paylink or the total value that can be gathered via a single Paylink.
Simply set appropriate values to the request parameter limit_options as detailed below
Do not set limit_options for Paylinks that are intended to be permanent: limit_options is an optional parameter and if not provided, the generated Paylink will stay active untill you deactivate it via the DELETE endpoint.
Set a transaction count limit: Set a integer value to the limit_options.count parameter to automatically disable the paylink when that number of payments have been successfuly completed.
Set a total amount: Set a decimal value to the limit_options.amount parameter to automatically disable the paylink when successfully completed payment transactions reach the desired total.
Setting multiple limits : When more than one limit parameter is set, the paylink is automatically deactivated whenever one of the limits is reached.
Branding
The Paylink UI supports the following white labeling features:
Displaying your logo on the top left or center.
Custom theming for all the buttons displayed.
Description text on the welcome page.
Custom UI texts.
Email templates with your branding.
Customized SMS messages.
Click on the diagram to see it full size.
[Remark] Contact your Ecospend representative in order to use branding, as any UI branding must be reviewed prior to being applied by Ecospend.
Customizing the User Journey
The Paylink user journey can be customized with client based configurations and request parameters.
The Paylink UI supports the following white labeling features:
Skip the bank selection screen: Providing the user's bank_id within the request parameters hides the bank seletion step.
Disable the consent screen: If you display a payment consent screen as described in the section PIS Consent Page then Paylink can be cofigured to skip this step.
Enable Payment Retries: If the PSU's payment journey ends in failure Paylink will display a result page with the outcome. Paylink can be configured to guide the PSU to retry payment with another bank or retry with the same bank from the result page.
Skip the result screen: If you display a payment result screen as described in the section PIS Result Page then Paylink can be cofigured to skip this step.
Send email notifications: By setting the request parameters send_email_notification and email Paylink will automatically send the paylink url to the PSU in emails with your brand on it.
Send SMS notifications: By setting the request parameters send_sms_notification and phone_number Paylink will automatically send the paylink url to the PSU as an SMS with your customized message.
Enable the 'Tip' screen: By setting the request parameter tip Paylink will initially display a Tip collection screen to the user which will be added on top of the amount request parameter and process the payment flow accordingly.
Configurable Duration
Unlike the payment_url from the bank, the paylink_url expiration duration can be configured to your use-case.
A Paylink will be active until it is deactivated. To deactivate a paylink you can call the DELETE http method with the specific paylink_id:
|
DELETE /payment-requests/paylink/{unique_id}
sample: DELETE /payment-requests/paylink/00000000-fcdf-1ee6-9fc2-6b119fa53fb0 |
Implementation Instructions
The flow diagram below depicts a fully delegated Paylink journey and the section below details each step with technical details:
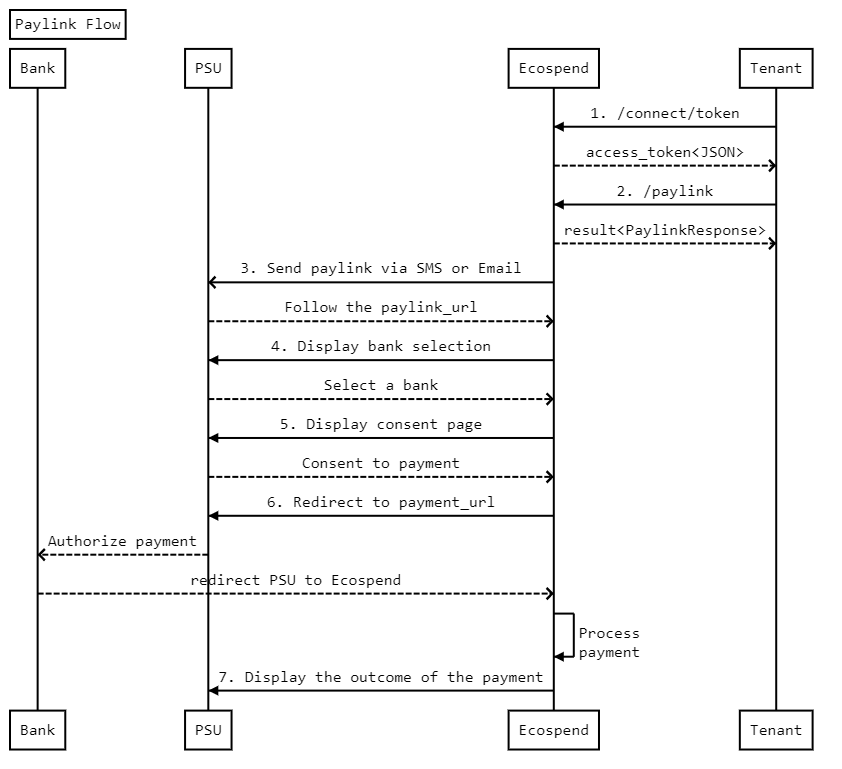
-
Authentication: /connect/token:
The initial step for all API services is getting the access token as explained in the Authentication section. This is accomplish by calling the /connect/token endpoint.
A successful authentication will return an Access Token (access_token), which needs to be provided with all subsequent requests.
-
Call Paylink endpoint: /paylink
Next, call the /paylink endpoint with the required request parameters.
The mandatory parameters are amount, reference, and creditor_account. The default value for all other parameters are false or null.
Remarks
- The url parameter of the response message is a paylink. The PSU can click it to initiate a payment process.
-
Present the Paylink to the PSU:
There are several options in Paylink to present the paylink to the PSU:
- The url parameter of the response message is a paylink. The PSU can click it to initiate a payment process.
- Using the qr_code value, you can display a QR Code to the PSU for them to scan with their mobile device to initiate the same payment flow.
- By setting the send_email_notification parameter of the Request message to true and providing a valid email address in the email parameter, the Ecospend Gateway will send an email (branded in your identity) to the PSU the paylink.
- By setting the send_sms_notification parameter of the Request message to true and providing a valid mobile phone number in the phone_number parameter, we will send an SMS text message with the paylink to the PSU.
-
Bank Selection:
After Step 3, the PSU will be redirected to the Paylink page, which will be designed with your brand and message. A list of banks will be displayed on this page.
After the bank selection, Paylink will first check if the selected bank is currently live. If the bank is not online or the payment cannot be initiated, it will inform the PSU and ask the PSU to select another bank or retry.
-
Display the payment consent page:
After a successful bank selection, the PSU will be presented with the consent page as described under Consent Page.
-
Redirect the PSU to the payment_url:
After the PSU consents to continue to their bank, the PSU will be redirected to the payment_url for the selected bank.
After that, the process goes on between the PSU and their online banking system. Despite slight differences between banks, in principle, the PSU logs in to their bank's system, sees the payment details and then authorises or cancels the payment. They, of course, can abandon without completing the process.
After completing or canceling the authorization process, the PSU will be redirected back to the Paylink Payment Result page.
-
Display the outcome of the payment:
The Paylink Payment Result page will have several layouts depending on the PSU's actions and ASPSP's response to these actions. If the PSU cancels the payment authorization or the ASPSP rejects the payment, the relevant information will be displayed and the PSU will be presented with two options:
- Try again: which takes the PSU to the Step 4 of this flow (bank selection page).
- Cancel/Close: which finalizes the flow and redirects the PSU to the redirect_url that you provided with the initial Paylink request message.
If the payment is completed successfully, the PSU will be presented with a payment summary as described under Instant Payment Step.5.
-
Handle the redirect:
Eventually the paylink will redirect the PSU back to your domain in the same manner as the Pure PIS solution does. Please refer the related documentation for details of the redirect.
Paylink Webhooks
Whenever a new payment is initiated via Paylink a webhook notification will be sent to your webhook endpoint indicating that the user has used the Paylink and started the payment journey. Such actions will raise a webhook notification with the event_value=AwaitingAuthorization.
Status updates on the payments initiated via Paylink will also trigger status update webhooks.
[Remark] Paylink webhook notifications will be set with value event_type=PaylinkPayment. Please refer to Webhook Documentation for the technical specifications.
Postman Collection & Code Samples
We have created a postman collection to ease the process of testing and integrating with our APIs.
Click this link to download our latest Postman collection.
Please visit our Code Samples page to see how to Paylink in various programing languages.
- Merchant Onboarding -
Introduction to Merchant Onboarding
To gain access to and use Ecospend Gateway’s open banking features for Merchant initiated operations, each merchant must complete a series of business and identity verification flows via our Merchant Onboarding APIs.
When our tenants are required to operate with onboarded merchants, Ecospend Gateway API’s POST endpoints and Management Console’s Transactional menus will require the ‘merchant_id’ information as a required field. And prior to any such operation, the tenant should have successfully onboarded the merchant (with the assigned ‘merchant_id’) via the Merchant Onboarding Process described below.
For non-onboarded merchants any of such operations will be denied by the Ecospend Gateway.
The Merchant Onboarding Process
This flow can be initiated by our tenants via the POST /onboardinglink endpoint. The details of the endpoint are available in our API Specification Documentation.
This endpoint will provide you with an Onboarding URL which an applicant (on behalf of the merchant) needs to complete according to the following steps of the Merchant Onboarding process;
-
Providing the following information about the business; Company Name, annual income, and accessing the bank account of the business via open banking during the process (this is required for the verification of the business bank account information).
-
Identity verification of the applicant with name and date of birth information.
-
Identity verification of all the UBOs (Ultimate Beneficial Owner) of the business entity (again with the name and the date of birth information of the individuals).
If there are UBOs other than the applicant, the system will ask for the UBOs email addresses from the applicant, enabling individual Onboarding links to be sent for their identity verification processes.
-
If date of birth and name is not sufficient for the identity verification, an additional - on screen - ID document verification journey may be required. In such a case, the individuals will be asked to present their ID documents to the system.
The Onboarding Link will automatically guide the applicants through those steps.
Once the business and UBOs identification checks are all completed, the result of the process will be sent to your system via webhooks. Please see our webhook documentation for details: merchant onboarding webhook specifications.
Technical Flow
The sequence diagram below depicts the integration requirements as well as the steps required for the applicants and UBOs to follow.
Click on the diagram to see it in full size.

Introduction to Webhook Notifications
At the end of each Merchant Onboarding process, Ecospend Gateway sends a webhook notification to your system regarding the outcome of the verification.
You must provide a publicly accessible REST (POST) endpoint with the signature below to make use of the Gateway Webhook Notifications. This endpoint is not required to provide any response body, and it should respond with HTTP Status Code 200 when the request was received.
The security of the data transmitted is sustained via the 'X-Signature' header parameter. X-Signature is the request body hashed with the 'secret'.
Both your webhook URL and the 'secret' can be managed by you on the Ecospend Management Console under the API Configurations menu.
Webhook Request
|
=HEADER=
X-Signature: " 5fe7f5f21cc138aa96dfab3fe6fb4e5d1a91fc07 "
=BODY=
{ |
[Remark] The check_result enumeration can have the value Verified or
[Remark] We strongly recommend that you implement the Signature Verification.
[Remark] Unless your webhook endpoint responds with an HTTP200 message, the exact same webhook request will be sent again after 60 minutes. There will be a maximum of 24 retries.
- Accessibility -
Introduction To Accessibility
Paylink and Datalink provide an end-to-end UX for both the payment and the account access consent journeys out of the box. In addition to their several configurable features, they both support the option of providing WCAG 2.2 compliant user interfaces.
How to enable Accessibility
The accessibility option can be enabled simply by setting a request parameter value for any POST/Paylink or POST/Datalink endpoints as follows;
- For the Paylink, set the paylink_options.accessibility_mode value to true.
- For the Datalink, set the datalink_options.accessibility_mode value to true.
Any Datalink or Paylink created with those request parameters will render WCAG 2.2 compliant user interfaces when the PSU visits the URLs
Accessibility mode for the Paylink and the Datalink have an option to display the bank’s logos, on the bank selection pages via the following optionel request parameters;
- For the Paylink, set the paylink_options.show_bank_logos value to true.
- For the Datalink, set the datalink_options.show_bank_logos value to true.
- Error Responses & Failure Codes -
Introduction
The Ecospend Gateway APIs respond with unsuccessful HTTP response codes and Error Response objects when a request cannot be fulfilled. These Error Responses provide detailed information about issues directly related to the API calls themselves. However, due to the complexity of open banking end-user journeys, which involve multiple redirects across different domains (tenant <-> Ecospend <-> banks), tracking and diagnosing errors that occur after the initial API call can be more difficult. This is because the Error Responses only cover the API call phase and do not extend to issues encountered during subsequent redirect journeys.
To address this challenge, we have introduced a ‘failure_code’ feature. This feature appends a ‘failure_code’ query parameter to the final redirect URL of the PSU (which is the tenant’s redirect URL), in addition to the existing ‘status’ parameter. The ‘failure_code’ provides specific details about errors that occur during the redirect process, which helps in identifying and resolving issues that are not covered by the initial Error Responses. Additionally, the ‘failure_code’ value will be included in the responses from the corresponding GET endpoints (e.g., GET /payments and GET /consents), providing further insight into any problems encountered throughout the end-user journey.
Http Response Codes
The table below provides the possible http response codes:
| Http code | Definition | Explanation |
|---|---|---|
| 200 | Operation Successful | See API specs for the specific response payload. |
| 204 | No Content | This is the response code that will be returned after successful DELETE operations. |
| 400 | Invalid Request | Either the data format or the values assigned have failed validation of the request. Each endpoint has different value validations and the Response payload will return an Error object with an explanatory text about the error. |
| 401 | Authorization Error | The token provided with the request has expired or is invalid. |
| 404 | Record not found | The request data is not present. |
| 405 | Method Not Allowed | Your client does not have required privileges to access the endpoint. |
| 500 | Internal Server Error | The Ecospend Gateway has encountered an error. |
| 502 | External service error | The external service that the Ecospend Gateway uses to fulfill your request has responded with an error. * Following our bank downtime announcements and ensuring your requests only call banks which are online will minimize this type of response. |
| 503 | Service Unavailable | The request url is not available at the moment. |
failure_code values
Compared to the protocol-specific HTTP Response Codes, failure_code(s) are business-specific and will vary in values and meanings depending on the service type and operation type being used, such as between AIS (Account Information Services) and PIS (Payment Initiation Services) journeys. The failure_code provides additional context and detail about failures that occur during the end-user journey, beyond what is covered by standard HTTP Response Codes.
failure_code’ aims to simplify the identification of the reasons for failure in any open banking journey based on data provided by the bank and other assessments. Consequently, the list of values provided for ‘failure_code’ may change over time, particularly with new additions. Therefore, ‘failure_code’ should not be treated as a static enumeration. We strongly recommend implementing a case where the ‘failure_code’ value can be a new value, other than the ones listed here.
The table below provides the possible failure_code values available at the moment:
PIS Failure Codes
| failure_code | Explanation |
|---|---|
| amount_limit | The payment amount was outside of the bank's acceptable range. This can be due to the amount of this payment or the PSU's daily transfer limit defined on the bank. |
| api_exception | Ecospend Gateway api has failed to respond due to an error. |
| bank_aml_check | The payment has failed to pass eligibility checks that are executed on the bank's side. * Due to security reasons further details regarding such cases can only be queried by the PSU from their bank directly. |
| bank_api_exception | The bank's APIs encountered an error and can not respond to your request at the moment. |
| bank_redirect_error | The PSU was redirected back to redirect.ecospend.com with invalid http query parameters, which are required for processing the payment. |
| canceled | The consent journey was canceled by the user. |
| consent_initiation_rejected | The bank's APIs returned a 'rejected' payment status before the start of the PSU's payment journey. |
| expired | The PIS consent granted for the VRP has expired. |
| file_upload_failed | The bulk-payment operation has failed. |
| hard_amount_limit_exceed | The POST /payments request has failed due to an amount limitation. Please get in touch with your account manager for the details of such limitations. |
| insufficient_funds | The PSU does not have sufficient funds for processing the payment. This case occurs after the PSU successfully authorizes the payment on their banking application, while the PSU is being redirected to your domain. |
| invalid_account_info | The account selected by the PSU on the bank's side is not eligible to be used for the type of payment being executed. |
| invalid_execution_date | For future dated payment operations the provided execution dates are not acceptable by the bank. |
| invalid_field | Bank does not support this context code type. |
| journey_dropped | The consent journey was not completed by the user due to desertion or an issue on the bank’s side. |
| merchant_unauthorized | The merchant_id request field was either not provided or assigned with a value which was not an onboarded merchant's id. Please see : Merchant Onboarding Guide for further details. |
| rejected_consent | The bank has responded with a 'rejected' status for the PSU's bank authorization after the PSU's payment journey on the bank's side. |
| rejected_payment | The bank has responded with a 'rejected' status for the PSU's bank authorization after the PSU's payment journey on the bank's side. |
| revoked | The PIS consent granted for the VRP has been revoked.. |
| revoked_sweeping | The PIS consent granted for the VRP-sweeping has been revoked.. |
| timeout | Ecospend Gateway api has failed to respond promptly. |
| unexpected_consent_status | |
| validation_failed | The payment operation was unsuccessful due to a validation check, the details of the validation check will be provided within the 'message' http query parameter. |
| other | Any other failure reason that has not been categorized yet. The message details may provide further insight. |
AIS Failure Codes
| failure_code | Explanation |
|---|---|
| bank_aml_check | The bank has failed the consent journey due to an eligibility check. |
| bank_api_exception | The bank's APIs encountered an error and cannot respond to your request at the moment. |
| bank_refresh_error | The bank's APIs encountered an error during the asynchronous AIS data refresh operation. |
| canceled | The consent journey was canceled by the user. |
| initiation_failed | The consent initiation was rejected by the bank. |
| not_authorised_consent | The consent could not be processed by the bank; for example if an error occurs unexpectedly during the redirect due to a bank error. |
| invalid_account_type | The bank has responded with an account type other than; IBAN, BBAN or SortCode and AccountNumber. |
| journey_dropped | The consent journey was not completed by the user due to desertion or an issue on the bank’s side. |
| multiple_account_selected | The consent journey has failed because the PSU has selected more than the allowed number of accounts on the bank’s side of the journey. |
| no_current_account_selected | No current account is available for this consent when "allowed_account_type": "current" is requested. |
| redirect_trace_error | |
| rejected_consent | The consent authorization was rejected by the bank during the user’s journey on the bank’s side. The bank’s do not disclose further details regarding why the consent was rejected. * For such cases, only the PSU can directly query the bank for details. |
| other | Any other failure reason that has not been categorized yet. The message details may provide further insight. |